Saturday, February 24, 2007

It's All In the Crust


We are enjoying typical northern California weather; cool, wet, and windy. Somehow that sort of combination makes me want to bake, but something savory instead of sweet.

Last fall, when our late tomatoes were finally ripe, I baked a pie with pesto and tomatoes. The recipe was created by the author of FarmgirlFare. Today I remembered how great that pie was, but knew that the chance of finding good tomatoes in February here is almost nil, so I changed just about everything but the crust and created a savory spinach and bacon pie.


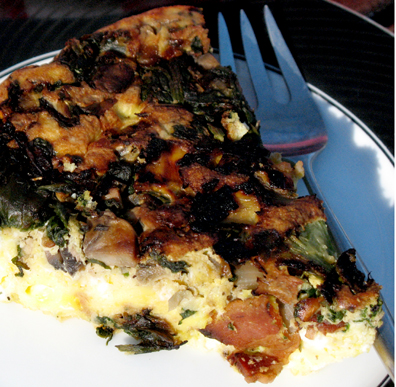
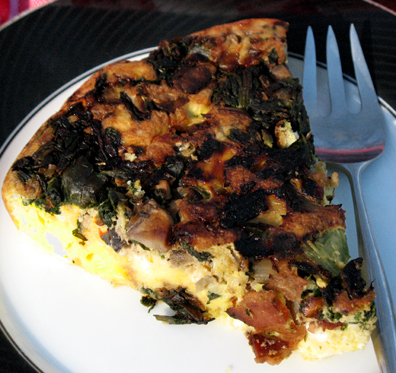
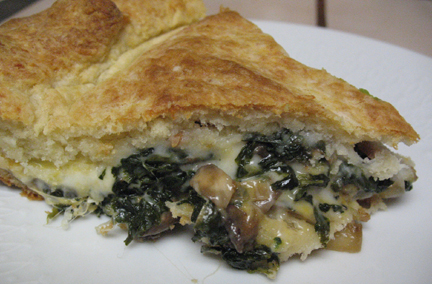
Just remember, though, the reason that this pie is so wonderful really is the crust. There IS also savory, succulent spinach, scented and flavored with onion and mushrooms, crisp bacon and it's fairly dripping with melted cheese, but the crust is still the star in my mind. It is sort of a biscuit dough. If you look at the photo of it in the pan, you can see how it browns nicely both where it meets the pan sides and on the top of the crust. The Parmesan cheese gives it a nice tang, too.

We found out sort of late that we were having another guest, so I made the pie in a 10 inch pan, but didn't increase the filling amounts. Not a great idea. The pie tasted great and did, indeed, feed all of us, but it looked a little thin and the crust looked a little too thick around the edges. It should work just fine in the 9 inch pan.

Since crust on top is one of the hallmarks of entries to this month's Waiter, There's Something in My...Pie, this works perfectly. Bake it up, cut a wedge, pour some red wine and sit back and enjoy whatever weather Mama Nature throws at you. Don't forget to go to Cooksister to check out all the great pies once you've eaten. Might find some dessert.

Savory Spinach Pie
Created by Elle based on a pie found at the FarmgirlFare.com blog

Makes One 9-Inch Pie


For The Sauteed Mushroom Mixture:
1-10 oz. package frozen chopped spinach, thawed, well drained
½ medium onion, diced fine
1 cup sliced mushrooms
¼ teaspoon dried thyme

In sautee pan, over medium-high heat, cook the onion and mushrooms in a small amount of olive oil until the onions are transluscent and lightly browned, about 4-5 minutes. Watch so that they don’t burn. Add the spinach and thyme and salt and pepper to taste. Stir to combine well. Set aside to cool slightly while you make the crust.

For The Crust:
2 cups all-purpose flour
4 teaspoons baking powder (make sure it's fresh!)
1 teaspoon salt
1/2 cup (1 stick/ 4 ounces) cold butter
1 cup (about 2-1/2 ounces) finely grated pecorino romano (or other hard cheese)
3/4 cup milk

Combine the flour, baking powder, and salt in a medium bowl. Mix in the butter using a pastry blender, fork, or your fingers until the largest pieces are pea-size. Stir in the pecorino romano. Pour in the milk and use a fork to gently form a soft dough. Do not overmix. Divide the dough in two pieces, making one slightly larger than the other.

On a generously floured surface, use a rolling pin to gently roll out the larger piece of dough into a circle about 12 inches across, rolling from the center outward. Sprinkle dough with flour if sticky. Gently fold the dough in half and transfer into a 9-inch pie pan. If the dough tears, simply press it back together with your fingers. Roll out the remaining piece of dough into a slightly smaller circle and set aside (or wait until you have the filling in the pan and then roll it out).

Assembling The Pie:
Sauteed mushroom mixture
6 slices bacon, cooked, drained and crumbled
6 ounces mozzarella, grated, mixed with 2 oz. sharp cheddar, grated

Using a spoon, spread ½ the mushroom mixture over the bottom layer of dough in the pie pan. Layer about half of the bacon over that. Cover the bacon with about 2/3 of the mozzarella- cheddar combination. Layer on the rest of the mushroom mixture (you may not need all of it to fill the pan – the rest would make a great omlette filling). Carefully sprinkle the remaining bacon over the mushroom mixture. Cover with the remaining mozzarella- cheddar mixture.
Roll out the second piece of dough if you haven't already, and carefully place it over the pie. Seal the top and bottom by brushing some water over the outer edge of the bottom crust, then pressing down on the top crust along that edge. Then trim the bottom crust mostly even with the top.

Fold the edge of the bottom piece over the top piece and press together to seal. Use your fingers to make a crimped design around the edge. If any dough falls apart, simply press it back together with your fingers. Don't worry if it isn't perfect. The handmade look has much more charm. Cut four slits in the top of the pie for steam to escape. Bake at 375 degrees F in the center of the oven until the crust is golden brown, about 40 minutes. Cover the edge with foil if it starts to brown too quickly.

Let cool on a wire rack for at least 15 minutes before serving. Crust edges may be sampled much sooner. (As with nearly any pie, if you cut into it while it is still warm, some juice will seep out. If you plan to store any leftover pie right in the pan, simply drain off the juice so the bottom crust doesn't become soggy.) Or cool pie completely, cover, and refrigerate.

This pie also freezes beautifully.


Wednesday, February 21, 2007

KISS


There are days to go wild in the kitchen and make all manner of complicated dishes, to bake angel food cake or croissants (many days), to make beef stock from scratch, including roasting the beef bones so as to make onion soup...something I did when I was much younger and very silly. But I rarely have days like that. One of the things about having so many enthusiasms is that the time for each is more limited than if I only loved, say, baking.

These days I'm much more likely, as are many folks I've been told, to be keeping lots of balls up in the air at one time so to speak. Cooking often is a team affair with Sweetie cooking one part and another part being mine. On days like today, or yesterday for that matter, it's important to remember something a teacher once taught me: KISS or Keep It Simple, Silly (well, she might have said 'stupid' for the last 'S', but silly is OK, too).


My KISS for today was roasted red potatoes. Perhaps it's my Irish heritage, but I often turn to potatoes when I'm doing the starchy part of the meal. These potatoes are quick and easy, but taste wonderful. A small amount of chopping of potato, onion and garlic, plus a shake of ingredients and some time in the oven combine a simple set of tasks that yield delicious potatoes.


The potatoes get nice and soft with crunchy browned bits and there is garlic and onion for flavor and rosemary for flavor and fragrance.

Rosemary is such a wonderful herb, although it can be an assertive flavor. To see some more great herb recipes, go over to Anna's Cool Finds for Weekend Herb Blogging, hosted by the delightful Anna. This is my first attempt to join in, so I'm hoping that Wednesday is close enough to the weekend to count.

Sweetie provided the steamed asparagus and broiled steak (every now and then he insists on red meat...what can I say?), which are both also KISS items.


Roasted Red Potatoes with Onion, Garlic and Rosemary

4 medium red potatoes, or other waxy fresh potatoes like Yukon Gold
2 cloves fresh garlic, minced
1/2 medium onion (yellow, white or red), diced
1 tablespoon fresh rosemary or 1 teaspoon dried (or more, to taste)
salt and pepper
olive oil

Preheat oven to 400 degrees F.
Wash potatoes and cut into bite sized pieces. Place in a plastic bag or zip-lock bag.
Add the minced garlic and diced onion to the bag.
If the rosemary is fresh, roughly chop it. If it is dried, break the needles up a bit. Add to the bag.
Add salt and pepper to taste to the ingredients in the bag. (This really means to add the amount of salt and pepper you usually use for these many potatoes. You can wait until it is all cooked and add salt and pepper then if you prefer.)
Pour about 2 tablespoons olive oil into the bag. Close the bag and shake vigorously.
Pour the contents of the bag into a baking pan which can hold them in a single layer.
Roast in middle of oven, uncovered, for about 20 minutes, or until potatoes are tender when pierced with a paring knife.
Serve at once. Serves 2-3.


(Edit taking place in April 2008) Although I'm not yet a member, I've asked to become a member of the Daring Bakers. Here is the February challenge:
The Daring Bakers, although still not being called that except by two, are now 10 bakers strong and the term 'challenge' is being used. The challenge was probably chosen by a vote.

Chocolate Intensity
from Tish Boyle's The Cake Book (makes one 9-inch cake)


8 ounces bittersweet chocolate (preferably 62% cocoa), finely chopped
12 ounces (3 sticks) unsalted butter, cut into pieces
1 cup granulated sugar
1/2 cup brewed coffee
6 large eggs
1 tsp vanilla extract
1/8 tsp salt

Preheat oven to 350F. Butter the bottom and sides of a 9-inch round cake pan. Line the bottom with a parchment round and butter the parchment. (If you're using a pan with a removable bottom like a springform, make sure to wrap the pan with 2 or 3 layers of foil.)

Place chopped chocolate in a large bowl.In a saucepan over medium-high heat, stir butter, sugar and coffee until the butter is melted and mixture is boiling. Pour the hot mixture over your chopped chocolate. Let stand for 1 minute then gently stir until chocolate is melted and the mixture is smooth.
In a medium bowl, whisk the eggs vigorously until blended. Whisk in the vanilla and salt. Slowly add about 3/4 cup hot chocolate mixture to the eggs, whisking constantly. (Tempering the eggs with a little bit of the hot chocolate mixture will prevent "scrambled eggs" when combining the two mixtures.)

Add the egg mixture to the hot chocolate mixture and whisk to combine well. Strain the batter through a sieve (to catch any cooked egg bits) and then pour batter into prepared pan.

Set cake pan in a large roasting pan and fill the pan with enough hot water to come halfway up the sides of the cake pan.

Bake for 35-45 minutes, until the center is shiny and set but still a bit jiggly.

Transfer cake pan to a cooling rack and cool for 20 minutes.

Run a thin knife around the edge of the pan to loosen the cake. Place a cardboard round on top of the pan and invert the cake onto it. Remove pan and carefully remove the parchment paper.

Refrigerate the cake for at least 2 hours before glazing with chocolate glaze or before serving unglazed with crème anglaise.


Chocolate Glaze
6 ounces bittersweet chocolate, finely chopped
2/3 cup heavy whipping cream
1 tsp vanilla extract


Place chopped chocolate in a medium bowl.In a small saucepan, bring the cream to a boil.

Remove pan from heat and add the chopped chocolate. Let stand for 1 minute then gently stir until chocolate is melted and the glaze is smooth. Gently stir in the vanilla.

Transfer glaze to a small bowl and cover the surface of the glaze with plastic wrap and let cool for 5 minutes at room temperature before using.


To glaze the cake:
Place the chilled cake, still on the cake round, on a wire rack set over a baking sheet. Slowly pour the hot glaze onto the center of the cake. Smooth the glaze over the top and sides, letting the excess drip onto the baking sheet.

Scrape the extra glaze from the baking sheet and put it in a small ziploc bag. Seal the bag and cut a tiny hole in one of the bottom corners. Gently squeeze the bag over the top of the cake to drizzle the glaze in a decorative pattern.


Refrigerate the cake at least one hour before serving.


Crème Anglaise(makes about 2 1/4 cups):

2 cups whole milk
1/2 vanilla bean, split
6 tbsp granulated sugar
pinch of salt
6 egg yolks


Pour milk into a heavy saucepan. Scrape vanilla bean seeds into milk and add the pod, sugar and salt.

Heat the milk mixture until warm but not simmering.

Prepare an ice bath (a bowl nested in a larger bowl filled with ice water).

In another bowl, whisk the egg yolks lightly. Slowly add about 3/4 cup of the warm milk to the egg yolks, whisking constantly. Pour the egg mixture back into the saucepan.Cook over low heat, stirring constantly, until the custard is thick enough to coat the back of a spoon.

Strain custard into the bowl set in the ice water. Stir the crème anglaise to cool it down.

Cover and refrigerate for up to 2 days.

Sunday, February 18, 2007

Decadent


It would have been nice to have a Velentine's day that included some seduction, but Sweetie had minor surgery in the morning, so we spent time together, but quiet time.

Today, however was another story. He's feeling fine and we topped things off with a truly decadent dessert. Imagine feeding each other pieces of apple dipped in warm, dripping chocolate caramel sauce that has bits of pecan swirled in it. Mmmm decadent. Follow that up with a dipped shortbread cookie, a dried cherry, an almond, a prune, a dried apricot. You get the idea. You can feed each other and lick your fingers and steal a kiss. Not saying that we did exactly that, but the opportunity for sweet seduction is part and parcel of this little gem. Now that this Turtle Fondue has put you in the mood, go on over to Jasmine at Cardamom Addict for Sugar High Friday#28 with the theme of Sweet Seduction. Who knows what inspiration you'll find.


If I were in the mood to make this fondue again, I'd so a few things differently. First of all I'd unwrap all those caramels before I chopped the chocolate so that if I cut my thumb, which I did, I wouldn't have to unwrap all those little devils almost one handed...a neat trick. Secondly, I'd combine the milk and caramels and cook them first until the candies had almost melted, then add the chocolate, melt, then the nuts. That way you can be sure that the candies are melted and smooth. With the nuts added before the melting, it's harder to tell what is smooth. Otherwise I'd do it the same. Having nuts and both dried and fresh fruits, plus the shortbread cookies meant that there were lots of different sizes and textures as well as flavors.

Turtle Fondue (With or Without the Pot)
Adapted from Perfect Recipes For Having People Over by Pam Anderson

8 oz. caramels, unwrapped
2 oz. semisweet chocolate, cut into small pieces
¼ cup finely chopped pecans, pre-toasted at 325 degrees for about 10 minutes until fragrant
¼ cup milk
Fresh fruit, such as apples, pears, bananas, strawberries, grapes or figs; larger fruit cut into bite sized pieces
Cubes of pound cake, pieces of shortbread cookies
Dried fruits like apricots, peaches or figs
(I added some almonds and macadamia nuts, too.)

Combine caramels, chocolate, nuts and milk in a small heavy saucepan (or a fondue pot) and heat over low heat, stirring frequently, until smooth and warm. Serve in small bowls with skewers (or fondue forks) for dipping fresh and dried fruits and pound cake. Dip cookies while holding end of the cookie.

If you have a fondue pot, use it. If you use the heavy pot, the fondue sauce retains the heat fairly well. If it starts to cool off, simply return the pot to the stove and reheat.

Serves 2 to 4.


Saturday, February 17, 2007

Well Met


There is something exciting, but slightly nervous making, about meeting someone in preson whom you've only 'met' via the internet.

Even though you love their blog and they sound great over the phone, it's still sort of like a blind date. Will you be comfortable and have things to talk about?

Today I met Anna of Anna's Cool Finds for an afternoon 'tea' at La Dolce V in Sebastopol, CA.
La Dolce V is a fine artisan chocolate company.

The shop and cafe' is right on Main Street in downtown Sebastopol. They have decorated it beautifully with lovely tables and nice chairs, tablecloths on the round tables and chocolate walls. They serve an array of gelato, which is new since they moved from their former tiny shop at the Antique Society building south of town. They also have beautiful chocolates, made in small batches, some flavored with tea infusions, a selection of baked goods, including the Ultimate Brownie, which really is pretty amazingly good. They have tea, coffee, and a French Hot Chocolate that Anna seemed to enjoy. She also had a layered dessert which looked like it included chocolate, coconut and nuts on a shortbread crust.

If you reserve the day before, La Dolce V also has a true afternoon tea with small sandwiches, a savory tartlet, scones and jam, lemon bar, macaroon and a chocolate bon bon.

I was pretty silly in my worries. Anna was delightful and, being interested in food, we had lots to talk about. We also had some city experiences in common so it was a really enjoyable afternoon. Life can be sweet and it's fun to make new friends. Well met, Anna. Hope to see you again soon.


Wednesday, February 14, 2007

How Do I Love Thee?... I Treasure You


This is the day to treasure those who make a positive impact in your life and a day to let them know that they do. Traditionally it's a day for lovers and sweethearts, but it is also a wonderful day to acknowledge in a loving way other valuable relationships. Valentine's Day has become a commercial holiday, with florists, restaurants, jewelers, sellers of chocolates and cards all playing on your emotions to get you to buy, buy, buy. You can resist and instead make your own cards for family, friends, co-workers and/or your special someone. You can also create a beautiful meal or a fabulous dessert or treat. The most important thing is to say what is in your heart.

I'm lucky to have a birthday the day before V-Day and this year my dear sister Natasha sent me the Williams Sonoma Muffins book and a lovely silicon pan with heart shaped cake molds in a very Valentine pink.

In the days before supermarkets, even before there was a U.S.A., a real treasure was your spice box or cabinet of herbs and spices.

Imported from exotic lands and usually costly, these items that add such dimensions to our food are something that we often take for granted now that they are easily available. I decided for Valentine's Day to bake a dessert for Sweetie that used a bunch of these spices and he cooked a leg of lamb for dinner that used some lovely herbs.

The fourteen herbs and spices pictured (you knew I'd work that 14 in somewhere, right?) include herbs thyme, oregano, sage, rosemary and parsley, plus spices cumin, cayenne, cardamom, cloves, ginger, allspice and cinnamon. The recipe for Spicy Gingerbread uses the last four, plus molassas and brown sugar. I served it with the lemon curd from a few days ago. Treasures of spice for my treasure of a man. He was very happy with this combo.


Spicy Gingerbread
From Williams-Sonoma Muffins


1 ½ cups all-purpose flour (7 ½ oz/235 g)
½ teaspoon bakind soda (bicarbonate of soda)
¼ teaspoon salt
4 teaspoons ground ginger (freshly ground is recommended)
1 ¼ teaspoons grounds cinnamon
¼ teaspoon ground allspice
¼ teaspoon ground cloves
½ cup unsalted butter, at room temperature (4 oz/125 g)
½ cup firmly packed brown sugar, light or dark (3 ½ oz/105 g)
2 large eggs
2/3 cup molasses, light or dark (4 oz/125 g)
2/3 cup buttermilk (5 fl oz/160 ml)
1 ½ teaspoons vanilla extract (essence)

Preheat the oven to 350 degrees F. (180 degrees C.) Grease and flour an 8 or 9 inch (20 or 23 cm) square baking pan or dish. If using a glass baking dish, use 325 degrees F (165 C) for oven temperature.

On a sheet of waxed paper, combine the flour, baking soda, salt, ginger, cinnamon, allspice and cloves.

In a large bowl, using an electric mixer on medium speed, cream together the butter and brown sugar until fluffy. Add the eggs, one at a time, beating thoroughly after each addition. Beat in the molasses. Add the dry ingredients in 2 increments, alternating with the buttermilk and vanilla. Beat well until fluffy and smooth yet thick.

Spoon the batter into the prepared pan and spread evenly.

Bake until the top is dry to the touch and the cake pulls away from the sides of the pan, 35-40 minutes. A toothpick inserted into the center of the cake should come out clean. Transfer the pan to a wire rack and let cool for 30 minutes.

Serve the gingerbread warm or at room temperature, cut into squares. Can be garnished with whipped cream or lemon sauce or lemon curd.

To make as small cakes, spoon the batter into the cups (or used greased muffin tins) to 2/3 full. Bake for 15 – 20 minutes or until the toothpick test (above) works. Let cook briefly, then turn out onto a rack to cool
.


Tuesday, February 13, 2007

How Do I Love Thee?... You Are Prime


Thirteen has a bad rep, but I don't believe in it. Maybe that's because I was born on the 13th, many moons ago in the month of February. Maybe it's because I've always been fascinated with prime numbers, numbers that are not divisible by any other number but 1, and 13 is such a number.

For whatever reason, I like 13. In the photo above there are 13 of my favorite mugs. Some are hand thrown by local potters, one comes from Asia, some are pretty like the one from a museum, some are Dansk mugs that hold just the right amount of coffee for me, one is pure white and great for tea and two others were gifts from Micca and Dawn. The glass and brass one at the front is from the local Hospice thrift store and is perfect for hot drinks like hot buttered rum or Irish Coffee since the glass can be pre-heated and the heat doesn't make it as far as the handles, so it's comfortable to hold while filled with hot drinks.

So tonight we can celebrate the primacy of love, beauty, and friendship in our lives. We can also celebrate my Irish heritage and natal day, and the rich, creamy, lovely oomph of a good mug of Irish Coffee. I'm also going to drink to only one more day to blog in my self-imposed run up to Valentine's day. It's been fun, but I'm running out of ideas.

Irish Coffee

For each cup pour strong brewed coffee in a pre-heated heat-proof glass with handle, filling about 2/3 of the way up. Add sugar to taste. Stir.
Whip heavy cream until it holds some shape.
Pour some Irish Whiskey gently into the coffee. A jigger is usually plenty, but use more or less as you desire.
Top with a generous dollop of whipped cream.
Drink at once for the best quality.


Monday, February 12, 2007

How Do I Love Thee?... Dozens of Ways


There is something so elemental about eggs. The shape is so pleasing to the eye, especially when there are three or more eggs together. Put a dozen, especially a dozen beautiful multi-colored eggs collected by the generous Elise, in a basket and you have a thing of beauty.

Each of those eggs could have a quality written on them to extol the virtues of someone dear: generous, kind, thoughtful, observant, patient, humorous, joyful, handsome or beautiful (or both), silly, sensous, and best of all, loving. Maybe we should decorate eggs for our Valentine with those things, or 'be mine' instead of using candy or saving the eggs for Easter.

Guess that won't happen, but there are still 12 eggs to be used for something delicious. How about a frittata? Something rustic and savory and full of robust flavors would be great for my Sweetie. My Big Fat Greek Frittata from Perfect Recipes for Having People Over was such a hit that I barely was able to take the photos before it was all gone.

Below you'll find the original version and the additions that I made. I did also delete the ham, but made up for that by adding bacon. As you can see in the photo, the vegetables are all at the top (which was the bottom of the pan) so they really were cooked both on the stovetop and in the oven. Next time I might mix them up with the egg mixture so that more egg is on the bottom of the pan. The fragrance of all those yummy ingredients was out of this world and it was rich in flavors. Go ahead, break some eggs!


My Big Fat Greek Frittata

12 large eggs
4 oz. feta cheese, crumbled (1 cup)
¼ cup grated Parmesan cheese
1 teaspoon dried oregano
Salt and freshly ground pepper
3 tablespoons olive oil
1 large garlic clove, minced
1 package (10 oz.) frozen leaf spinach, thawed, squeezed dry, and chopped
6 oz. ham, cut into small dice

Adjust oven rack to middle position and heat oven to 400 degrees F.
1n a large bowl, whisk eggs, cheeses, oregano, salt and pepper (to taste).
Heat oil and garlic in a large (12-inch) ovenproof nonstick skillet over medium-high heat until garlic starts to sizzle and turn golden. Add spinach and cook until excess moisture evaporates, about 1 minute. Add ham, shaking skillet to distribute evenly. Add egg mixture. Cook, without stirring, until eggs start to set around edges, about 1 minute.
Transfer pan to oven and bake until frittata is puffed and set, 10-12 minutes. Slide or invert onto a large plate, cut into wedges, and serve.


My version:
In a small skillet, cook 2 strips bacon, cut into roughly 1 inch pieces, 3-4 mushrooms, diced, 1 small zucchini, cut in half lengthwise and sliced, half a small red onion, diced in ¼ inch dice. Saute until vegetables have softened. Add to the pan at the time you start cooking the garlic. Don’t use the ham. Continue with the recipe as above, including using the spinach. If I make this again, I might stir the vegetables into the eggs, then pour over the garlic and oil in the pan. That way more of the egg would be on the bottom of the pan and less of the vegetables.


Sunday, February 11, 2007

How Do I Love Thee?... Joyfully


It's not difficult to find reason for joy. It can be as simple as a sunny day after days of gray and rain, as happened today here in northern California.

It can be knowing the Sweetie loves me even when I make no sense as I did at lunch time today when I first told him it was OK to eat a leftover for lunch, then told him no (I hadn't had time to photograph it for the blog) then told him it was OK, then told him both pieces were OK, then said that I needed one of the pieces (wasn't sure I'd gotten good photos and was feeling insecure...know that feeling?), then told him it was REALLY OK to eat both. Poor guy! It's not easy loving a food blogger sometimes.


It can be stopping cleaning to take an afternoon break for tea and an English muffin with fresh lemon curd on it. Something about lemon is so joyful to me. Tea, too. So much so that I have at least 11 teapots. I use them often because then I have a second cup (or one for Sweetie like there was today) ready to go and hot.


As you can see from the photo, they are an eclectic assortment. The green one up front is my favorite everyday pot. It has a nice texure to it and holds the heat well. The calico one on the right is a special one from my daughter. She found it once and found an exact replacement when the handle was broken on the first one. So thoughtful! The one with violets on the far left is from my Mom and the stacked one with violets is from a local antique place. I rarely use it, but love the shape and decorations. It's also fun to have a lot of big teapots, like the one at the back, for the Christmas Tea Party that I've done for a number of years. Didn't happen this year since we were in Seattle, but maybe next year?

A great thing to have with tea is a muffin, biscuit, or scone slathered with this tart and sweet and very rich lemon curd. It keeps up to 3 months in the fridge, but rarely lasts that long around here. It also makes a lovely gift, especially for a tea loving friend, in a pint jar with a ribbon around the neck.


Zesty Lemon Curd Yields 3 Cups Stores up to 3 months in fridge

3-4 fragrant, bright-skinned lemons
1/2 Cup (1 stick) plus 2 Tablespoons butter, cut up
Pinch of salt
4 egg yolks
1 whole egg
1 1/4 Cups sugar

1) Run 2 inches of water into the base pan of a double boiler and set over medium heat to come to a brisk simmer.
2) Grate or shred enough lemon zest from washed & dried lemons to make 1 1/2 tablespoons, packed, lemon zest. Place the zest in the top pan of the double boiler. Juice the lemons and strain juice to make 1/2 Cup; add to the zest. Add the cut up butter & salt to the pan. Set aside.
3) Beat the egg yolks and whole egg together at high speed in the large bowl of an electric mixer until they are foamy; gradually add the sugar, continuing to beat the mixture until it is pale, fluffy, & very thick, about 5 minutes.
4) Scrape the egg mixture into the double-boiler top and set the top into the base containing simmering water. At once begin whisking the mixture; cook it, whisking constantly, until it has thickened smoothly and is steaming hot, about 15 minutes. Be careful not to overcook the curd; it is done when it will coat a metal or wooden spoon heavily. Remove the upper pan from the hot water.
5) Pour the curd into a fine-mesh sieve set over a bowl and press it through with a rubber spatula, leaving the shreds of zest behind (discard shreds). (It is o.k. to leave the zest in the curd, but the texture is different.) Scrape the curd into sterilized jars. Let it cool uncovered. Cap jars of cooled curd with sterilized lids. Refrigerate the curd.

Note: This can be made with lime zest & juice. Use 1 Tablespoon lime zest and 1/2 Cup lime juice and follow the recipe the same way for everything else.


Saturday, February 10, 2007

How Do I Love Thee?... You're a Ten


Isn't it interesting how humans have used the number 10? One of the standard questions on a survey is to rate something 'on a scale of one to ten' with ten being the best (highest, etc.). Don't know if it still happens, but women used to be rated that way casually by guys as in, "She's a ten, man!" which meant that she was hot, foxy and so on. Lots of things depend on ten like the decimal system and even the computer. Basic computer programming is based on 1 and 0. And it probably all started with our ten fingers and ten toes...an easy way to count that is always with us.

In the kitchen our hands with those ten fingers are the workhorses. Stirring, chopping, grating, peeling, mixing, straining, beating...lots of things are done better by hand. And there are also the learned experiences that are invaluable. When we learn to test the doneness of a cake or muffin by giving the middle a gentle push with our finger, feeling just how springy the response should be, that's so satisfying. We can learn to do the same thing with fish or chicken to know when they change from almost cooked to just right, before they, within seconds, change to overdone.

Fingers can be used, clean ones of course, to stir together the dry ingredients for a cake if you can't or won't sift. They can be held together to create the perfect tool to fold flour into beaten egg whites for angel food cake...so much more responsive and gentle than a spatula. Use them to scoop up just chopped vegetables or fruits (see photo) to transfer to pan or platter. Endlessly useful, easy to clean and always at hand (sorry about that...puns run in the family), think of your fingers as the perfect ten for the kitchen.


Friday, February 09, 2007

How Do I Love Thee?... As a Do Gooder


Chocolate, chocolate, chocolate! I love the stuff. There are so many forms of it to love. There is milk chocolate and cocoa powder, there is Baker's German's Sweet which makes such a yummy German Chocolate Cake with coconut, there is semisweet, bittersweet and unsweetened with deep, dark flavors. The semisweet even comes as chips famous for Toll House cookies. There is white chocolate and even chocolate syrup. So many ways to love chocolate Probably more than today's nine if you count all the variations like those flavored with mint or hazelnuts or raspberry. Yum!

So how does chocolate tie in with do gooders? Well, one of my favorite do gooders is Sweetie. He is a director on the local fire board and used to coach soccer. I happen to think that do gooders are great! Then there is my good friend Heidi. She has been active in the community of at least 25 years, serving on school boards, hospital foundation boards, community service boards, and the local open space board to name some of them.

We're going to dinner at her house and I'm bringing one of my favorite chocolate recipes: 86 Proof Chocolate Cake. Don't you just love the name? It's from Maida Heatter's Book of Great Chocolate Desserts and is a dense, moist, deeply chocolate cake baked in a bundt pan. It travels well and always gets eaten first at pot lucks. It also makes cute cupcakes and mini-cakes.

A month ago I helped to make some in star shaped mini-cake pans for a luncheon of another do gooder organization, P.E.O. This organization has been giving scholarships and loans for over a hundred years to help women reach their dreams through education. The mini-cakes were so cute with pink roses and silver and gold dragees and pink drizzled glaze. Unfortunately I didn't take any pictures.

So this is a great cake for do-gooders and everyone else if you really, really like chocolate. The booze? Well, most of the alcohol cooks away in the baking, but the smokey taste (in this case of bourbon) enhances the chocolate. You can use any favorite. Irish whiskey is great for St. Patrick's Day in March. After all, St. Patrick was a do gooder in some people's opinion.

86-Proof Chocolate Cake

dry bread crumbs
1 teaspoon cocoa powder
5 oz. unsweetened chocolate
2 cups sifted all-purpose flour
1 teaspoon baking soda
¼ teaspoon salt
¼ cup dry instant coffee or espresso
Boiling water
Cold water
½ cup bourbon (or Irish whiskey, scotch, rum, cognac, Amaretto, etc.)
½ lb. (2 sticks0 sweet butter
1 teaspoon vanilla
2 cups sugar
3 eggs (large or extra large)
Optional: confectioner’s sugar

Preheat oven to 325 degres F after putting oven rack 1/3 up from bottom. Butter a 10 cup capacity Bundt or other fancy tube pan. Dust the whole inside with fine, dry bread crumbs that have been mixed with a teaspoon of cocoa powder. Invert pan over a piece of paper and tap lightly to shake out excess crumbs. Set the pan aside.

Melt the chocolate in the top of a small double boiler over hot water on low heat (or microwave one minute at a time at half power, stir, continue until melted and smooth). When melted, set aside to cool slightly.

Sift together the flour, baking soda and salt and set aside.

In a 2-cup glass measuring cup dissolve the coffee in a bit of boiling water. Add cold water to the 1 ½ cup line. Add the bourbon. Set aside.

Cream the butter in a large mixer bowl. Add the vanilla and sugar and beat to mix well. Add the eggs one at a time, beating after each addition. Add the chocolate and beat until smooth. Scrape bowl and beaters often.

Then, on low speed, alternately add the sifted dry ingredients in 3 additions with the liquids in 2 additions, add the liquids very gradually to avoid splashing. Continue to scrape bowl and beaters often.

Pour into the prepared pan. Level the top. Bake for 1 hour 10 minutes or 15 minutes until a tester in the middle of the cake comes out clean and dry.

Cool in the pan for about 15 minutes. Then cover with a rack and invert. Remove the pan, sprinkle the cake with a bit of optional bourbon if desired, and let cool.

Move to a serving plate and sprinkle the top with confectioners sugar through a fine strainer if desire.

Cake is wonderful as is or can be served with whipped cream or vanilla ice cream.


Thursday, February 08, 2007

How Do I Love Thee?... Like Family


Not everyone grows up in a household that includes seven siblings. This can be a good thing of a bad thing. In my case, I feel very lucky that I had so many brothers and sisters around and two loving parents who raised us to be individuals and to use our talents as much as possible. Education was valued, as was reading, family time, the value of work well done, and puns. My Dad, the ultimate punster, has been dead for many years, but I still have eight wonderful family members, my Mom and seven sibs, to love and they know me from the beginning, which is special. I love each of them in different ways and wish that we were together more often.

Growing up with so many folks to gather 'round the dinner table, it was only a matter of time until we not only learned to cook, but took on one night's dinner so that Mom had a break. Somehow my night was Friday. Occasionally that meant that Dad showed up with a couple of jars of shucked, fresh oysters which had to be breaded and fried. When you're doing it for three or four, it's not too bad, but for eight, nine, or ten, that's a lot of oysters to cook. And that's not even talking about the hush puppies that went with the oysters.

One of my favorite meals to cook for Friday was Salmon Loaf Supreme. If any of my sisters or brothers reads this, they will probably groan remembering. It wasn't exactly everyone else's favorite. One of the reasons I liked it was because it goes together very quickly and so did the whole meal. Along with the loaf I usually cooked baked potatoes, since they could cook in the oven with the salmon loaf, plus green beans or peas from the freezer and gingerbread or pudding cake for dessert, which could also cook in the oven with the salmon loaf. That way, once the entree and potatoes were in the oven, I had about a half hour to do homework before I mixed together the dessert and heated up the veggies.

Because the Salmon Loaf Supreme didn't get rave reviews from my family, I never cooked it for Sweetie and the kids. Little did I know that Sweetie would like it, but a month or so ago I made it up into patties which I pan fried (added a little extra bread crumbs and it worked fine). He was very complimentary, so I made up the actual loaf for this post. He liked that even better. Salmon is one of my favorite foods. All this time I had denied myself the canned variety and this recipe thinking that I was the only one who would enjoy it. Silly me. Now a can of salmon will be in the pantry all the time for the occasional Salmon Loaf Supreme...just not every Friday.

The photo at the top is how it looks as a loaf. The second photo shows the onions, pepper, eggs and mayo. The colors just look so pretty. Hope you'll give this a try and let me know if you agree with my brothers and sisters or with Sweetie.

Salmon Loaf Supreme
Not sure where this one originated

½ cup mayonnaise
1 cup undiluted condensed cream of celery soup
1 large egg, beaten
½ cup onion, chopped
¼ cup bell pepper, green or red, chopped
1 tablespoon lemon juice
1 teaspoon salt
2 cups salmon, canned or cooked, pink or red, flaked
1 cup fine bread crumbs, plain

Combine mayonnaise, soup, egg, onion, pepper, lemon juice and salt in a medium bowl. Mix well
Add salmon and bread crumbs. Mix well.
Pack into a greased 8”x4”x2” loaf pan.
Bake 1 hour in a preheated 350 degree F oven.
Remove from oven and turn out onto a platter. Garnish with lemon wedges and serve.
Serves 6-8


Wednesday, February 07, 2007

How Do I Love Thee?... Sweetly


It's no secret. I love chocolate and candy and all the refined sugar treats. But there is something wonderful about the sweetness of dried fruits. My favorite dried fruits happen to number 7.

Dried fruits that I almost always have in my pantry include cranberries (Craisins), apricots, raisins, cherries, currants, prunes, and figs. The raisins, either regular or golden, go into my almost daily oatmeal for breakfast. One of my favorite tea cookie recipes uses the currants, plus raisins. Prunes are a favorite snack when i want something sweet, but also somewhat healthy. Figs are sweetie's favorite snack, although he also mixes up a bunch of these dried fruits, some nuts and a dollop of chocolate chips when he has been working hard. Apricots are one of my favorite dried fruits to bake with because the heat brings out their sweet goodness. The same is true of dried cherries. My sister lives near Traverse City in Michigan and they are one of the best places in the world to find cherries, so she shares with us by sending the best dried cherries for Christmas. They are so big, even when dried, that they're almost too much, too intense for eating out of hand. In baked goods they really shine.

This recipe uses both the apricots and the cherries in a sensuous, melt in your mouth scone. This one appreciates your gentle handling by being almost as light and flaky as a well made biscuit, but with the rich taste of a scone. Butter gives the flavor here, so do use butter. The buttermilk makes it lighter than if you'd used cream, but also contributes to the tenderness. Try these for breakfast. You won't need any extra butter or jam, but who says you can't guild the lily if you want to?

Dried Fruit and Citrus Scones
Adapted from a Ladies Home Journal recipe March ‘97

Heat oven to 425 degrees F. Grease a cookie sheet.

3 cups all-purpose flour
½ cup sugar
2 ½ teaspoons baking powder
1 teaspoon salt
½ teaspoon baking soda
¾ cup unsalted butter, at room temperature (no substitutions)
¾ cup finely diced dried fruit (can be one or more of the following: apricots, dried cranberries, golden or dark raisins, dried cherries, currants, dried peaches) I used apricots and cherries, diced
½ cup chopped pecans
1 cup buttermilk
2 tablespoons grated orange peel

Glaze: 2 tablespoons heavy cream
2 tablespoons sugar

Combine flour, sugar, baking powder, salt, and baking soda in a large bowl. With pastry blender or two knives, cut in butter until mixture resembles coarse crumbs. Add diced dried fruit and pecans. Combine buttermilk and orange peel in a bowl or measuring cup. Pour over crumb mixture. Stir together with fork just until mixture comes together. Gather dough gently into a ball; knead 4 or 5 times. Cut dough in half and transfer pieces to prepared cookie sheets. Shape each piece into two 6 inch x 1/4 inch thick circles, 2 inches apart. Using floured knife, cut each circle into 8 wedges.
For glaze, brush tops with cream and sprinkle with sugar.
Bake 20 – 25 minutes until toothpick inserted in the center comes out clean. Serve warm or at room temperature.
Makes 16 scones.


Tuesday, February 06, 2007

How Do I Love Thee?...Any Way You Slice it

I love using good knives when cooking. It makes everything much easier when the knives are sharp and easy to grab. I have a wooden knife block on the counter which holds my six favorite knives: a 10 inch chef's knife, a long serrated bread knife, a serrated 10 inch knife, a utility knife (which is my favorite) which also has a serrated edge, and a small paring knife, plus a spreader which has a serrated edge and can be used as a knife, too.

No photos or recipe today. Too many other responsibilities and not enough sleep have caught up with me.

....But I'm sure you have your own favorite knives and recipes that depend on good knives. Want to share?


Monday, February 05, 2007

How Do I Love Thee?...I'm Nuts About You!


Sweetie loves nuts. It's his favorite snack, especially peanuts, cashews and macadamia nuts.

I’ve been saving this recipe for a long time because it sounds like something that he would love. When I wrote about making tart dough with the food processor a few days ago, I remembered this recipe and decided that it’s the perfect thing for day five, made with five nuts: walnuts, pecans, macadamias, almonds and hazelnuts. Great idea, but a search of the pantry did not turn up the hazelnuts, so I’m cheating a bit…only four nuts. Let’s just pretend that it’s all five, O.K. It’s been a long day. I also used two different china patterns to serve the tart slices, but it tasted yummy on both. The slice on the white plate is at the bottom of today's post.

Nut Mosaic Tart
Adapted from a Sunset Magazine recipe from around 1983

Use all of one kind of nut, or equal parts of a variety

3 cups whole or half nuts (almonds, walnuts, hazelnuts, macadamias, pistachios, pecans, peanuts)
Butter pastry (recipe follows)
3 eggs
1 cup honey
½ teaspoon grated orange peel
1 teaspoon vanilla
¼ cup butter or margarine, melted
Sweetened whipped cream (optional)

Place nuts (if unroasted) in a shallow pan and put into a 350 degree F oven until lightly toasted, about 10 minutes. (Toasting each variety of nut in a separate pan helps you keep from burning the smaller nuts). Let cool.


Press butter pastry evenly over the bottom and sides of an 11-inch tart pan with a removable bottom.

In a bowl, combine eggs, honey, orange peel, vanilla, and melted butter; beat well until blended. Stir in toasted nuts. Pour into pastry-lined tart pan. Bake on the bottom rack of a 350 degree F oven until the top is golden brown all over, about 40 minutes.

Let cool on a wire rack. Remove pan sides. Offer wedges with whipped cream. Makes 10-12 servings.

Butter Pastry
Combine 1 1/3 cups all-purpose flour, 3 tablespoons sugar, and ½ cup butter, cut into piees. Whirl in a food processor or cut butter in with a pastry blender or two knives until coarse crumbs form. Add 1 egg yolk; process or sir until dough sticks together.


Sunday, February 04, 2007

How Do I Love Thee?...Try Four


February fourth is Super Bowl Sunday, but that's not all.

Sweetie and I went to town and bought some more redwood for the deck and then put all of the photographs into the frames after cleaning the glass and writing on the mat with the photo title and my signature and the date. We did get to watch the game while doing the framing.

I love to make Sweetie a warm, satisfying meal when he has worked so hard. Yesterday he'd been building the stairs from the front walk to the first part of our entry deck, including the tricky joinery for the railing which is at an angle and today he helped me, too. So, what to cook?

The show of photographs is going to be installed at a local cafe' on Monday morning, so, besides the framing, I've been in Photoshop land, which meant that I needed the meal to be (1) simple, too.

To add to the merriment, it also had to be something with few enough ingredients that I (2) wouldn't need to go to the store again, plus I wanted to phone my Mom (which I love, love doing) before dinner, so I needed (3) something that could sit in the oven a while and not overcook if our conversation took a bit longer than expected. That's a lot to expect from any recipe. It also had to (4) be no more than four main ingredients to go with today's date. Wheew.

The perfect choice turned out to be a recipe from 1982 that I've used many times over the years. It was part of a Women's Day magazine article on things to cook with only four main ingredients.

When I was working full time, taking care of 2 kids, and volunteering, being the driver to kid events, etc. I even made this when I first got up and put it, partly cooked, in the fridge before going to work. It goes together that easily. The baking in the oven happened once I got home & while it cooked I was able to get the kids started on homework or baths and so on. Great recipe for busy lives.

This version of Chicken Cacciatore uses only four main ingredients: chicken, onion, canned tomatoes (or use fresh if you have the time) and parsley. It goes well with rice, polenta, and mashed potatoes (my choice today). If you thicken the sauce, it works well with pasta, too.

It really does sit up to an hour in the oven without drying out if your skillet has a good cover. Or seal it with some aluminum foil while it sits.


Chicken Cacciatore
From Women’s Day 12-14-82

1 chicken, cut up (I used 8 chicken thighs)
1 large onion, sliced thin
1 16 oz. can tomatoes, cut up
3 tablespoons parsley, chopped

salt & pepper to taste & olive oil for the bottom of the pan

Sprinkle chicken with salt. In a large, heavy ovenproof skillet, over medium heat, brown chicken in hot oil. (I use just enough oil to coat the pan bottom to keep the chicken from sticking. If you have a large, heavy ovenproof non-stick skillet, you don’t even need the oil.)
Add the onion; cook about 3 minutes, stirring, until the onion is crispy-tender.
Remove pan from the heat. Stir in the tomatoes and pepper. Sprinkle with the parsley.
Bake in a pre-heated 350 degree F. oven for about 40 minutes, or until tender.
Serve, or stand in turned off oven up to 1 hour.
Serves 4-6.


Saturday, February 03, 2007

How Do I Love Thee?... A Little, More, A Lot


Today is three things, right?

It may seem silly, but I have three food processors. They stair-step like the Three Bears. The baby one rarely gets used, although it’s good for chopping herbs. I’d just rather use a sharp knife most times.

The middle one (Mom) is great for turning oatmeal into oat flour for pancakes or muffins, for mixing herb compound butters and similar medium sized jobs.

The big daddy is the most useful, although it takes up a lot of space. My favorite use is to make cookie dough. I love making butter cookie recipes which go together really quickly in the food processor. Tart dough is another one that often can be done in a snap with the processor. It’s also good for grating vegetables and such, but cleaning up the discs and work bowl takes more time than just using a box grater for small amounts, so guess what I use?

Although I posted Chocolate Shortbread Hearts in December, here is the way to do them with the food processor. You can do it in the medium sized one too, but it puts a lot of stress on the motor since it makes a dense dough. The bigger one is better if you have it. If you don’t have a processor, go to the recipe for a mixer in the archives, Dec.9, 2006. Since these are heart shaped, they are perfect for Valentine’s treats.

Although I wouldn’t have used the food processor in 1980 to make these cookies (I didn’t own one yet), the recipe was in the Maida Heatter’s Book of Great Chocolate Desserts from 1980, so let’s hear it for Retro Recipes #6 with the theme of Food of Love by Laura of Laura Rebecca’s Kitchen. Hearts, chocolate, butter…what could be a better food of love than these cookies?


Chocolate Shortbread Hearts – Food Processor Version
a recipe in Maida Heatter’s Book of Great Chocolate Desserts, 1980

2 cups sifted all-purpose flour
1/4 teaspoon salt
1/2 cup strained unsweetened cocoa powder
1 cup (2 sticks) butter, softened
1 cup confectioners sugar
1 teaspoon vanilla extract

1) Preheat oven to 300 degrees. Adjust two racks to divide oven into thirds.

2) Fit the food processor with a steel blade and place the dry ingredients in the bowl. Cut the cold butter into ½-inch slices over the dry ingredients. Add the vanilla. Cover and process until the ingredients hold together. Remove the dough from the food processor. Form the dough into a ball and flatten it slightly.

3 )Flour a pastry cloth and rolling pin. Place the dough on the cloth and turn to flour both sides. Roll the dough until it is 1/2 inch thick (no thinner) with the same thickness all over. Re- flour the rolling pin as needed while rolling out dough.
4) Dip a 1 1/2 or 2 inch heart shaped cutter in flour, tap off excess. Cut the cookies as close to each other as possible. Place the cookies 1 inch apart on unbuttered cookie sheets. With skewer or tines of a fork, pierce cookies in a pattern. Bake 25 to 30 minutes until cookies are firm to the touch. Check often. These burn easily. Transfer to racks to cool.

Makes about 3 dozen.


Friday, February 02, 2007

How Do I Love Thee?...Two to One - Daughter and Son


Today it's two - two siblings - one cookie two ways.


Our local paper has a feature where they ask a different subscriber each week to answer some questions about themselves. Along with favorite book and movie and what your mother always told you, they ask for your most proud moment. Many times the answer is "The birth of my child(ren)". I'm right there with them. It is simultaneously an ordinary and amazing thing to be pregnant and deliver a child. There is nothing like it and the thrill of being a parent is never as ebulient as the day they are born, but it never really goes away if you love children.

I've been blessed with a daughter and a son. I was lucky because I got to experience mothering both genders. Each child is a masterpiece, so there really is no comparisons to be made. Each has brought me joy in their own way.

My daughter figured out much earlier than I did how to be a real friend with her Mom, so she and I have a very special relationship now that she is an adult. She is beautiful (really) and talented, hard working, super intelligent and organized, loyal, a good friend to many and she has a wicked wonderful sense of humor, plus a love of odd movies.

My son required an eagle eye of watchfulness as he was growing up because he was intensely curious...I think he identified with Curious George. He was a good friend who always looked for people with good hearts before any other attribute. He loved computers and Magic cards and role playing games and soccer, among other things. He played the alto sax in middle school and the trombone in high school. The years went quickly. He died in an auto accident when he was a few weeks short of his 17th birthday. Years have passed since then, but I sometimes almost hear him up in his room instant messaging his buddies.

You learn a lot when life gives you such a huge lemon to deal with. I've learned to cherish my husband, daughter, family and friends. I've learned to take on new things with gusto and am no longer patient since I now know in a gut way that we don't have endless amounts of time, but I've also learned to be kinder. I've learned to celebrate what I've had and enjoy what memories there are that make me smile. There are more of those all the time.

One happy memory is the days when either kid would have a party at school and I would need to bring a treat for the party. My favorite was the Giant Party Cookie which can be shaped and decorated in different ways depending on the party theme. It is even thick enough to stand birthday candles up in, at least long enough to sing "Happy Birthday" and blow out the candles. As it happened, while moving the heart cookie to photograph, it almost broke. Pretty appropriate I'd say.

For today I made a heart version to go with my February romance theme, but since we are getting close to Super Bowl Sunday, I also made one in the shape of a football. In case you think these are just for kids, think again. The football was devoured by the guys pretty quickly.

Giant Party Cookies

Preheat oven to 375 degrees F

2 ½ cups all-purpose flour
1 tsp. baking soda
1 tsp. salt
1 cup (2 sticks) butter or margarine, softened
¾ cup granulated sugar
¾ cup brown sugar, light or dark, packed
1 tsp. vanilla extract
2 large eggs
½ cup quick rolled oats
2 cups (12-oz. package) semi-sweet chocolate chips
½ cup chopped nuts

For circle or heart shaped cookie:
1 cup M & M candies in appropriate colors
1 cup confectioners sugar
2 tablespoons hot milk
Assorted cake decorations such as dragees, colored sugar, colored small shapes, chopped nuts

For football shaped cookie:
1 cup confectioners sugar
2 tablespoons hot milk
1 tablespoon cocoa
more confectioners sugar as needed

Combine flour, salt and baking soda in a small bowl. Beat butter, granulated sugar, brown sugar and vanilla extract in a large mixing bowl and beat until creamy. Add eggs, one at a time, beating well after each addition. Scrape bowl and beaters. Gradually beat in flour and beat until mixed. Beat in oatmeal. Mixture will be stiff. Stir in chocolate chips and nuts.

Line a 12” pizza pan with foil. Spray with cooking spray. Put 2 cups of the dough on the foil. Using floured fingers, shape dough into desired shape, either circle or heart. Make shape about 10” in diameter. Exaggerate the shape since cookie will spread. Football shape can be made on foil lined rectangular cookie sheet. For circle or heart, sprinkle M&Ms over dough shape and pat lightly into dough.

Bake one sheet at a time in middle of oven for 15 - 18 minutes until golden brown. Let sit on sheet for 10 minutes, then slide shape on foil onto a cooling rack. Continue to bake the rest of the dough. You can make regular drop cookies with the remainder of the batter if desired.

Once the cookie has cooled, decorate for a party! Mix the confectioners sugar and milk and drizzle over the cookie in a random pattern. While it is still wet, sprinkle cake decorations over as desired.

For the football, use the confectioners sugar and milk. Remove 2 tablespoons to a resealable sandwich bag. To the remaining glaze add the cocoa and mix well. Spread in a football shape over the cookie, starting in the middle and spreading outward. Let glaze dry. Mix another 2 teaspoons of confectioners sugar into the glaze in the sandwich bag, or more confectioners sugar if needed, to make a firm icing. Mix well. Make a small cut on the corner of the bag. Squeeze the icing through it onto the cookie to make lines that mimic football lacing.

Put decorated cookie on party platter and serve. Pieces can be broken off or you can cut it into portions. If it is for a birthday party, candles will stand up for a brief time; long enough to light them and sing Happy Birthday!


Thursday, February 01, 2007

How Do I Love Thee??...Let Me Count the Ways


February is the month for romance and romantic love. Something has to be hot when it's so cold outside right?

In the spirit of the poet who wrote the sentiment on the title, I'm planning to post something each day until Valentine's day with love as the general theme and the day of the month as the sub-theme. Let's see if I make it. That's a lot of posts.

Today is the first. The first person in my life is Sweetie.

We have been married for over 25 years. Like any couple together that long, there have been ups and downs, but overall our love is stronger and sweeter now than when we first met. I'm a lucky woman. Not only is he a great husband, friend and father, plus carpenter, electrician, mechanic, plumber and cook, but he does laundry, dishes, grocery shopping and more, plus putting up with my temper, my probing questions about building, and my long hair mucking up the plumbing.
Of course he gets freshly baked cookies and other goodies, a back and neck rub once or twice a day, and I laugh at his bad puns. There's lots more, but lets get on to the food!


One of his favorite foods is cheese, especially hard cheeses like Romano and Parmesan. So to start the run up to Valentines Day off, we have Parmesan Crisps shaped like hearts. They are pretty easy to make if you have a good cheese grater and a hot oven and some parchment paper. I served them to Sweetie with a glass of good Port, some raw almonds, and a smile. See if the number one person in your life likes them, too.


It's jumping the gun a bit, but this combo is perfect for the next Blog Party over at Dispensing Happiness. Imagine sitting in front of the fire with your own sweetie, a glass of port, some almonds and these crispy hearts. Multiply by all the friends at the party. Lots of smiles.


Parmesan Lace Heart Crisps

1 ½ cups (6 oz. package) shredded Parmesan cheese

Adjust oven rack to the middle position in the oven. Heat the oven to 425 degrees F. Line a baking sheet with baking parchment paper.

Spoon about 1 tablespoon of the grated cheese onto one corner of the paper. Spread into a heart shape with your finger into more or less a single layer. Repeat with more cheese, leaving about an inch between shapes.

Bake until crisps are melted, bubble and shapes become cohesive, about 5 minutes. Transfer parchment paper to a cooling rack. When crisps solidify, peel gently off the paper and serve.